[phpBB Debug] PHP Warning: in file [ROOT]/includes/bbcode.php on line 488: preg_replace(): The /e modifier is no longer supported, use preg_replace_callback instead
[phpBB Debug] PHP Warning: in file [ROOT]/includes/bbcode.php on line 488: preg_replace(): The /e modifier is no longer supported, use preg_replace_callback instead
[phpBB Debug] PHP Warning: in file [ROOT]/includes/bbcode.php on line 488: preg_replace(): The /e modifier is no longer supported, use preg_replace_callback instead
[phpBB Debug] PHP Warning: in file [ROOT]/includes/bbcode.php on line 488: preg_replace(): The /e modifier is no longer supported, use preg_replace_callback instead
[phpBB Debug] PHP Warning: in file [ROOT]/includes/bbcode.php on line 488: preg_replace(): The /e modifier is no longer supported, use preg_replace_callback instead
[phpBB Debug] PHP Warning: in file [ROOT]/includes/bbcode.php on line 488: preg_replace(): The /e modifier is no longer supported, use preg_replace_callback instead
[phpBB Debug] PHP Warning: in file [ROOT]/includes/bbcode.php on line 488: preg_replace(): The /e modifier is no longer supported, use preg_replace_callback instead
[phpBB Debug] PHP Warning: in file [ROOT]/includes/bbcode.php on line 488: preg_replace(): The /e modifier is no longer supported, use preg_replace_callback instead
[phpBB Debug] PHP Warning: in file [ROOT]/includes/bbcode.php on line 488: preg_replace(): The /e modifier is no longer supported, use preg_replace_callback instead
[phpBB Debug] PHP Warning: in file [ROOT]/includes/bbcode.php on line 488: preg_replace(): The /e modifier is no longer supported, use preg_replace_callback instead
[phpBB Debug] PHP Warning: in file [ROOT]/includes/bbcode.php on line 488: preg_replace(): The /e modifier is no longer supported, use preg_replace_callback instead
[phpBB Debug] PHP Warning: in file [ROOT]/includes/bbcode.php on line 488: preg_replace(): The /e modifier is no longer supported, use preg_replace_callback instead
[phpBB Debug] PHP Warning: in file [ROOT]/includes/bbcode.php on line 488: preg_replace(): The /e modifier is no longer supported, use preg_replace_callback instead
[phpBB Debug] PHP Warning: in file [ROOT]/includes/bbcode.php on line 488: preg_replace(): The /e modifier is no longer supported, use preg_replace_callback instead
[phpBB Debug] PHP Warning: in file [ROOT]/includes/bbcode.php on line 488: preg_replace(): The /e modifier is no longer supported, use preg_replace_callback instead
[phpBB Debug] PHP Warning: in file [ROOT]/includes/bbcode.php on line 488: preg_replace(): The /e modifier is no longer supported, use preg_replace_callback instead
[phpBB Debug] PHP Warning: in file [ROOT]/includes/bbcode.php on line 488: preg_replace(): The /e modifier is no longer supported, use preg_replace_callback instead
[phpBB Debug] PHP Warning: in file [ROOT]/includes/bbcode.php on line 488: preg_replace(): The /e modifier is no longer supported, use preg_replace_callback instead
[phpBB Debug] PHP Warning: in file [ROOT]/includes/bbcode.php on line 488: preg_replace(): The /e modifier is no longer supported, use preg_replace_callback instead
[phpBB Debug] PHP Warning: in file [ROOT]/includes/bbcode.php on line 488: preg_replace(): The /e modifier is no longer supported, use preg_replace_callback instead
[phpBB Debug] PHP Warning: in file [ROOT]/includes/bbcode.php on line 488: preg_replace(): The /e modifier is no longer supported, use preg_replace_callback instead
[phpBB Debug] PHP Warning: in file [ROOT]/includes/bbcode.php on line 488: preg_replace(): The /e modifier is no longer supported, use preg_replace_callback instead
[phpBB Debug] PHP Warning: in file [ROOT]/includes/bbcode.php on line 488: preg_replace(): The /e modifier is no longer supported, use preg_replace_callback instead
[phpBB Debug] PHP Warning: in file [ROOT]/includes/bbcode.php on line 488: preg_replace(): The /e modifier is no longer supported, use preg_replace_callback instead
[phpBB Debug] PHP Warning: in file [ROOT]/includes/bbcode.php on line 488: preg_replace(): The /e modifier is no longer supported, use preg_replace_callback instead
[phpBB Debug] PHP Warning: in file [ROOT]/includes/bbcode.php on line 488: preg_replace(): The /e modifier is no longer supported, use preg_replace_callback instead
[phpBB Debug] PHP Warning: in file [ROOT]/includes/bbcode.php on line 112: preg_replace(): The /e modifier is no longer supported, use preg_replace_callback instead
[phpBB Debug] PHP Warning: in file [ROOT]/includes/functions.php on line 4789: Cannot modify header information - headers already sent by (output started at [ROOT]/includes/functions.php:3916)
[phpBB Debug] PHP Warning: in file [ROOT]/includes/functions.php on line 4791: Cannot modify header information - headers already sent by (output started at [ROOT]/includes/functions.php:3916)
[phpBB Debug] PHP Warning: in file [ROOT]/includes/functions.php on line 4792: Cannot modify header information - headers already sent by (output started at [ROOT]/includes/functions.php:3916)
[phpBB Debug] PHP Warning: in file [ROOT]/includes/functions.php on line 4793: Cannot modify header information - headers already sent by (output started at [ROOT]/includes/functions.php:3916)
AutoQuad Forum • View topic - First plunge to AQ with 80cm hex

First plunge to AQ with 80cm hex

Show us your flight videos and pictures of your aircrafts

First plunge to AQ with 80cm hex

Postby Trnquill » Fri Oct 11, 2013 10:32 am

I got interested in AutoQuad sometime during spring this year and soon bought the board together with six ESC32's. I managed to design some mounts for the ESC32's quite fast but then brushless gimbal frenzy hit the world and I spent practically whole summer tinkering with Panasonic GH2 to Canon 5Dmk3 -sized brushless gimbals. Now that the hype seems to calm down little by little I have finally some time to continue building the hex. I don't have many pictures of the aircraft but since I have asked many question in this forum I decided to share with you some details of the build. I'll update this thread little by little as final stages of the build progress towards first test flights. All the pictures are from Instagram so pardon the artsy-fartsy feel.

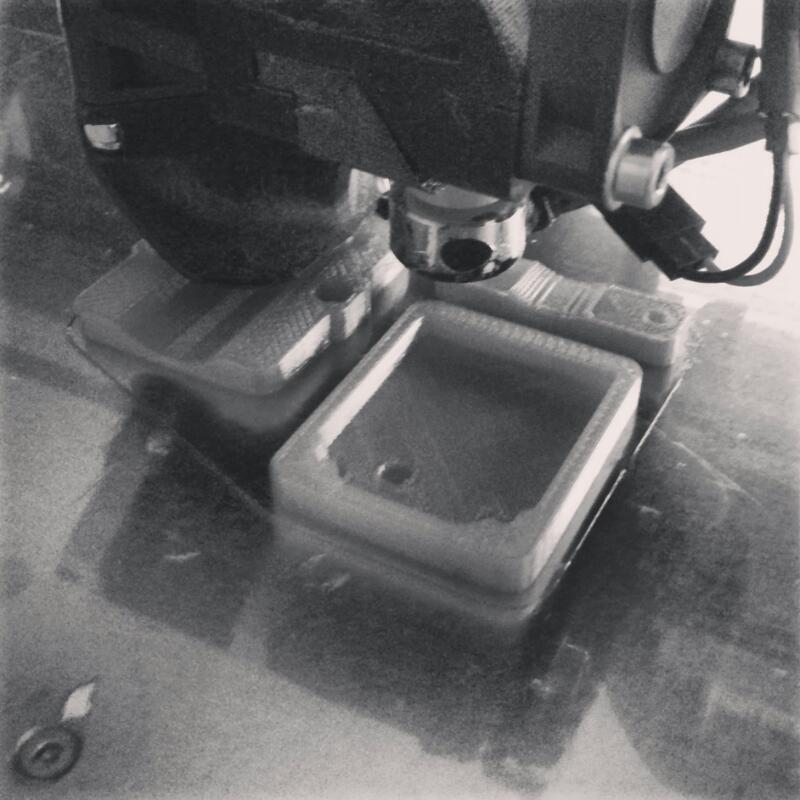
Ok, first thing to do was design some kind of mount for the ESC32's. I first thought mounting them to center frame but reading about electrical interference and such finally decided to mount them close to motors. I ordered some (really over the top) heatsinks from eBay together with some additional capacitors to handle the longer battery wires. Then I designed & 3D printerd a mount for the package. ESC32 + two heat sinks + three caps neatly in a "wind tunnel" mount.

Image
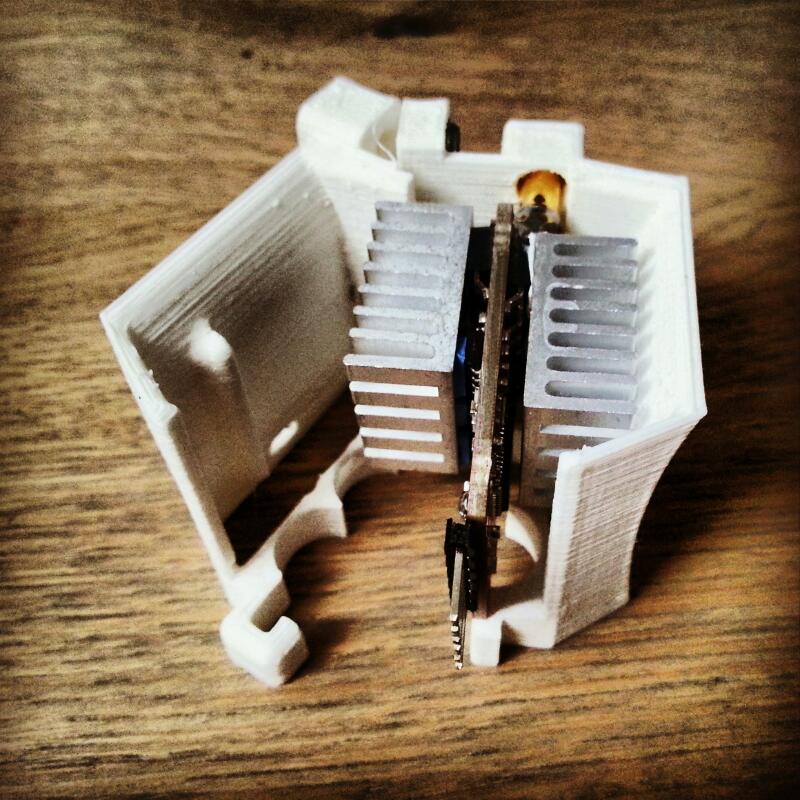
Caps are missing from the picture and they will sit under the ESC on those half round recesses.
Trnquill
 
Posts: 159
Joined: Thu Jun 06, 2013 9:35 am

Re: First plunge to AQ with 80cm hex

Postby Trnquill » Fri Oct 11, 2013 1:42 pm

I will use Futaba S.Bus radio so I bought a Skookum inverter. Telemetry will be sent to ground using XBee Pro S1 radios. I plan to implement a XBee->BT->tablet/PC configuration later on but for now use plain XBee->USB->PC to view telemetry and do the tuning. I had some major difficulties getting XBees to work with AutoQuad (see viewtopic.php?f=33&t=2664). Having all sorts of errors when updating XBee firmware on my Win7 desktop PC didn't help at all, either. After few days of intensive fiddling I managed to get XBee link up and running!

Image

3D printing a case for XBee. The case will be mounted underneath back motor boom:
Image
Trnquill
 
Posts: 159
Joined: Thu Jun 06, 2013 9:35 am

Re: First plunge to AQ with 80cm hex

Postby Trnquill » Fri Oct 11, 2013 1:58 pm

Motors for this bird are DualSky XM5010TE-4's. I had some trouble getting them to work with ESC32 but luckily that problem was quickly resolved by brilliant minds on this forum (see viewtopic.php?f=26&t=2457&p=14264#p14264). As said, the ESC32's are mounted at the end of motor booms, near motors. There is a hole in the boom for battery and signal wires to pass through and travel inside the boom to the frame. I printed ESC32 holder and clamping booms for one of the booms red and other white to somehow mark rear end of the hex.

Booms are 25mm in diameter and a tad less than 40cm in length. All the custom mounting blocks are 3D printed. Motor mount blocks are standard half moon shaped block and the center frame mounting blocks have one through bolt to lock the booms in place:
Image

At heart of the hex there is a little power distribution board. It will take power from 4S flight battery (or a pair, actually) and distribute it to six ESC32's and three smaller cables with JST connector for miscellaneous tasks (including powering the AutoQuad board):
Image
Trnquill
 
Posts: 159
Joined: Thu Jun 06, 2013 9:35 am

Re: First plunge to AQ with 80cm hex

Postby Trnquill » Fri Oct 11, 2013 2:00 pm

At the moment I have the frame fully assembled and waiting for AutoQuad board and all the necessary connections from it to ESC's. After that I will add quick release vibration isolation mount for camera gimbal and do dynamic calibration. Can't wait!

This (as all my hex's) is a folding design:
Image
Trnquill
 
Posts: 159
Joined: Thu Jun 06, 2013 9:35 am

Re: First plunge to AQ with 80cm hex

Postby Cookiemonsta » Fri Oct 11, 2013 3:17 pm

Nice piece of work ;)
Hope you get it flying very soon :)

Btw am I the only one who hasn't got a 3d printer yet? XD

Have fun,

Tobi
Cookiemonsta
 
Posts: 126
Joined: Thu Apr 11, 2013 3:31 pm

Re: First plunge to AQ with 80cm hex

Postby Trnquill » Fri Oct 11, 2013 9:01 pm

Thanks! I try to get that up as soon as possible. If everything goes according to plan I can make the dynamic calibration this weekend.

Today I mounted AutoQuad board together with GPS and its shield on top of the frame. I crimped servo connectors to all ESC wires and did ESC32 runs calibration on one of the motors with APC Multirotor 12x4.5 propeller. The picture above shows an APC Thin-E 12x6 prop. I then flashed all the remaining ESCs with the same firmware and uploaded the settings from the first calibrated ESC in the same go. I have still some mounting up to do (receiver and jDrones IO board together with some LEDs), soldering battery connectors and leveling the motors but then everything is setup!

Here's a shot of ESC32 mounts:
Image
Trnquill
 
Posts: 159
Joined: Thu Jun 06, 2013 9:35 am

Re: First plunge to AQ with 80cm hex

Postby Jdmagoo » Fri Oct 11, 2013 10:16 pm

Awesome work!! Can't wait to see more photos and video
Jdmagoo
 
Posts: 485
Joined: Sun Feb 17, 2013 8:35 am

Re: First plunge to AQ with 80cm hex

Postby chschmid » Sat Oct 12, 2013 1:30 pm

Very nice build. Keep us updated.
Make sure you protect the caps from vibrating "off".

Cheers
Christof
chschmid
 
Posts: 1800
Joined: Wed Jul 11, 2012 7:41 pm
Location: Herrliberg, Switzerland

Re: First plunge to AQ with 80cm hex

Postby Trnquill » Sat Oct 12, 2013 3:10 pm

Trnquill
 
Posts: 159
Joined: Thu Jun 06, 2013 9:35 am

Re: First plunge to AQ with 80cm hex

Postby Trnquill » Wed Oct 16, 2013 10:03 am

I managed to get the hex to a point where I could mount camera and do dynamic calibration. Calibration procedure was a tad hard with AUW for hex at 2800g and camera gimbal at 1500g totalling almost at 4,5 kilograms! :P Now my hands are sore but the card is full of good data (I hope). :) My PC is crunching the numbers as we speak. Step 4a took forever to get more than 10 loops with no change in MAE. 4b went through a lot faster! I'm currently running step 5.

Image

What's still left undone is aligning the motors (as you can see from the pic) and tidying the wiring a bit. After that it's test flight time! I hope I get that far this weekend.
Trnquill
 
Posts: 159
Joined: Thu Jun 06, 2013 9:35 am

Next

Return to AQ Media Showcase

Who is online

Users browsing this forum: No registered users and 13 guests

cron